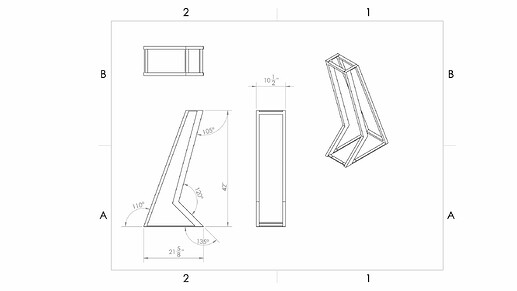
Hey everyone! Today, I want to walk you through a recent welding project I worked on with Jett, my 15-year-old son who’s learning the ropes of fabrication. (Click here to watch the video we made about this) We were building a 2D side profile of a king post, and I thought this would be a perfect opportunity to dive into some fixture table fundamentals, weld sequencing, and why the right setup makes all the difference.
Setting Up on the Fixture Table: Precision and Ease
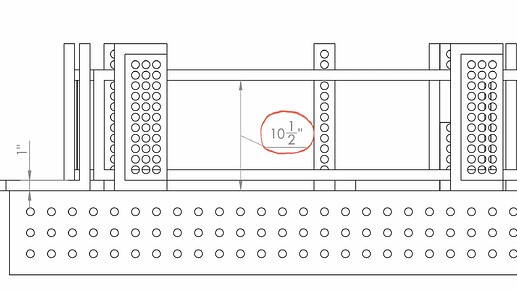
This project involved setting up two side profiles of the king post and figuring out how to hold them apart. We had a set distance of ten and a half inches to maintain, but instead of eyeballing or measuring each piece, we used the fixture table’s precision-drilled holes to our advantage.
I had Jett use a combination of shims and bolts to set up a “shelf” exactly where we needed it. It’s much faster than setting up a bunch of fiddly fixtures and trying to dial everything in perfectly by hand. The table makes it easy to place clamps exactly where we need them, and everything fits together smoothly.
One of my favorite tools for this part is the mini clamp. It’s a versatile little guy that locks into place with a set of teeth on an eighth of an inch increment. I showed Jett how to set up these clamps, and it clicked for him—literally and figuratively! We tried a few different methods, but the Fireball system offers so many configurations that you can always find the perfect fit for your project.
Clamping Options: Versatility for Every Need
One of the standout features of the Fireball system is the variety of clamps available. For example, I showed Jett some sidewinder clamps, which are great when you need to push at an angle, or even clamp from the side if the standard options don’t quite fit. Other table manufacturers often rely on basic setups with slots and bolts, which can be a pain to adjust repeatedly.
I demonstrated how we could hold the piece securely at the right height and angle using a few different clamp types, like the cantilevered clamps. They’re perfect for those tight spots where other clamps just won’t reach. This is why I love the Fireball system—it’s adaptable, and it works the way you need it to, instead of forcing you to work around the limitations of the equipment.
Fixture Table Tips: The Right Tools for the Right Job
I’ve worked with a lot of fixture tables over the years, and one thing I can’t stress enough is using the right measurement system for your setup. If you’re working in imperial measurements, use imperial fixtures. Metric to imperial conversions can get weird fast, and the last thing you want is to be fighting with your tools. For Jett, we kept it simple and stuck with the imperial shims and blocks, making every adjustment quick and straightforward.
Speaking of costs, some of these metric fixtures with slotted adjustments can get expensive. We’re talking about $180 setups that can be replaced with a $20 fence block and a 50-cent bolt in the Fireball system. For schools, colleges, or anyone on a budget, this is a no-brainer—more precision and fewer headaches for a fraction of the price.
Understanding Weld Sequence: Control is Key
With our setup complete, we moved on to welding. When it comes to welding, controlling the movement and securing the joints in the correct sequence is crucial. We start by welding the joint on the outside to control the rotation of the parts. Since this weld’s already preventing the structure from moving sideways, the angle is the only thing left that needs control.
Our next critical weld was on the top surface. We positioned the weld at the crotch because it gave us control over the most crucial area. From there, we worked our way outward, knowing that once the weld cools, it wouldn’t move much. By just following this sequence, the structure was already feeling pretty secure and not shifting around.
The third weld should be on the backside, but sometimes that area isn’t accessible if it’s on the fixture table. No worries, though; the joint’s still pretty secure. The final weld—the fillet weld on the inside—has the most leverage and can affect the whole setup, so saving it for last is always a good strategy. If you’re doing tack welds, remember to follow the same sequence: outside first, then the center, and finish with the fillet.
Inspecting the Work: Checking for Accuracy
Once Jett finished welding the frames, we removed the fixtures, slid out the assembled piece, and did a thorough inspection. I always tell people, QC (quality control) your work—it’s the most important part of fabricating. A quick check with a square and some measurements showed that Jett’s welds were nearly perfect. A minor teeter-totter due to a weld bead was easily fixed, and everything else lined up beautifully.
To check for plumb and level, I used a 28-inch tower block as a straight edge, and I gotta say, Jett’s accuracy was impressive—within a 32nd of an inch out of plumb. We also checked with a digital angle finder, which confirmed that Jett’s angles were spot on, with less than half a degree of deviation. Not bad at all!
Wrapping Up and Moving Forward
This project wasn’t just about welding; it was about building confidence and learning how to use tools effectively. Jett did an incredible job, and it’s clear he’s got a bright future ahead in fabrication. Remember that practice and the right setup make all the difference. With the right fixture table, clamps, and tools, you can turn any project into a success. And it doesn’t matter how experienced you are.
If you’re inspired by what you saw and are considering a fixture table for your own shop, take a look at our Fireball Dragon Wagon. It’s perfect for small workshops and entry-level fabricators, with room to grow as your skills improve. And if you have any questions or want to see more, join us on the Fireball forum, where we’re always sharing tips, tricks, and the latest in fixture fundamentals.
Thanks for watching, and I’ll see you in the next build!


